Home » Concrete Contractor
Category Archives: Concrete Contractor
How to Find a Qualified Concrete Contractor
Licensed concrete contractors provide construction services that include building foundations, walls, slabs, and other concrete features for commercial and residential projects. They are skilled in a variety of construction techniques and innovative technologies.
To choose the best concrete contractor for your project, be sure to assess their experience and ask about pricing quotes. You should also consider how flexible they are and whether they can meet a timeline. Contact Concrete Contractor Columbus for professional help.
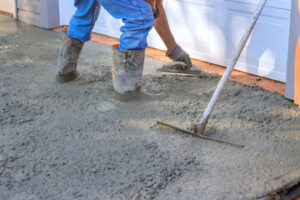
Concrete is one of the most widely used construction materials. Despite its seemingly simple composition, it requires a high level of craftsmanship and dedication to work with. Professional concrete contractors are trained in various skills and have the experience to handle a variety of project types. When looking for a contractor for your next project, consider asking about their years of experience. A qualified and experienced contractor will be able to provide you with quality results that will last for a long time.
It is also important to ask a potential concrete contractor about their previous projects. Look for a portfolio that shows photographs of past jobs such as decks, patios, walkways, driveway paving, foundations, and concrete floors. These photos will give you an idea of the contractor’s work and style. Be wary of a contractor who is reluctant to share their work samples or doesn’t have a website or social media account where they can display their portfolio.
An excellent concrete contractor will be able to complete your project within an agreed upon timeline while upholding a high standard of quality. Ask the contractor how they manage unforeseen challenges during construction and what they will do to ensure that your project is completed on time and within budget.
A quality contractor will be willing to share their warranty information with you. This will show that they stand behind their work and are confident in their ability to resolve any issues that may arise after completion of the project. Inquire about the duration of their warranty and how they handle any claims that are filed after the completion of the job.
Passion for the craft is what truly underpins a successful concrete contractor. This is what drives them to excel at their work and bring the vision of their clients to life. It is also what fuels their drive to continue learning new techniques and innovations in the industry.
Lastly, an excellent concrete contractor will be able to communicate effectively with their clients and other contractors on the job site. They will have a clear understanding of their client’s needs and expectations, and will be able to work with the other tradespeople involved in the project to achieve the desired outcome.
Licensing
Concrete is a common construction material that is used in many different ways. Its versatility is one of the reasons why it is so popular and it’s important for contractors to have a wide range of skills in order to complete projects safely and properly. A good concrete contractor can take a project from start to finish, which can save time and money for both the client and the contractor.
In order to become a concrete contractor, an individual must first meet the licensing requirements. Licensing requires a certain amount of experience and knowledge about concrete work, as well as a background check and the ability to pass an exam. The exam typically covers both the technical aspects of concrete work and business-related subjects. Applicants may want to consider taking educational courses or joining study groups to prepare for the exam.
Once a candidate meets the requirements for licensure, they can begin applying for concrete contractor jobs. It is important to apply for a license as early as possible, as it can take several months or longer to be approved. During this time, candidates should collect documents and proof of their work history and submit them to the appropriate authorities. It is also important to include a cover letter with the application that describes their experience and highlights areas of expertise.
The licensing process can be a lengthy and complicated one, and it is important for contractors to keep up with the requirements. They should also be aware of any changes in requirements or legislation that could affect their career. It is also important for contractors to stay up-to-date with new technologies and materials, as this will help them to provide their clients with the best quality service possible.
A concrete contractor should be able to manage their time effectively and remain on schedule, even if the project goes over budget or has unexpected delays. This is a vital skill that can help them maintain profitability and avoid disputes with clients. Concrete contractors should also have excellent interpersonal communication skills in order to build strong relationships with other construction professionals and clients.
Insurance
Whether you are building a concrete driveway or an industrial warehouse floor, choosing the right contractor is essential to the success of your project. Asking the right questions can help you find a reputable contractor with the experience, licensing, and insurance coverage to handle your job. Checking for these items will also allow you to avoid potential misunderstandings and ensure compliance with local regulations.
Obtain thorough bids from several contractors to compare pricing, work timelines, and materials to be used. Make sure to clearly state the scope of your project and any design considerations that may affect the cost or scheduling. The more information you can provide, the better the contractor will be able to provide you with an accurate quote.
Review past projects and client references to assess the quality of a contractor’s work. Look for photos, testimonials, and case studies to gauge the level of professionalism and customer satisfaction. It is also important to consider the tools and construction methods a contractor uses as these can impact the final product. Reputable contractors will stand behind their work and offer a warranty on their services.
While general liability is a must for most businesses, concrete contractors often require additional types of coverage to protect themselves from specific exposures. For example, workers’ compensation insurance is required by law in most states and provides medical benefits and wage replacement in the event of an accident or illness. Professional liability insurance safeguards against claims of errors or omissions in your professional services, and completed operations insurance extends liability protection even after a project is finished.
Additionally, concrete contractors rely heavily on their equipment and machinery to complete jobs. In the event that your equipment is stolen or damaged, repairing or replacing it can be expensive and disrupt your business. To mitigate these risks, equipment insurance (also known as inland marine) offers coverage for the repair or replacement of your machinery and tools regardless of where they are located. This is typically included in a comprehensive business owners policy or BOP. However, some insurance providers offer standalone policies for this coverage.
Portfolio
In this digital age, it is important for concrete contractors to have a portfolio of photos of past jobs. This shows potential clients the type of work they can expect, and it helps them envision what their final project will look like. Contractors should display their portfolios on their website and social media accounts. A quality portfolio will showcase projects that include decks, patios, walkways, driveway paving, foundations, and retaining walls. It is also a good idea to schedule multiple estimates before making a decision.
How to Choose the Right Concrete Repair Product for Your Project
Repairing concrete faults promptly saves you a lot of cost and improves the lifespan of the structures. It also helps reduce slip/trip/fall hazards that might cause injuries to people.
Some repair methods produce heat during curing and can cause thermal stress beyond an acceptable level, or shrinkage. They can also require special materials that are odorous, toxic, or combustible. Visit https://www.concreterepaireauclaire.com/services to learn more.
Concrete surfaces need constant protection from the elements. Cracks in exterior concrete can lead to water infiltration which leads to corrosion and damage to underlying materials. This damage can lead to structural problems in the future, especially if it is left untreated. This is why it is important to address these issues as soon as possible. Crack repair is an effective way to stop further damage and keep a building in good condition.
Concrete surface repair techniques involve filling or sealing the damaged area. Surface repair is best for hairline cracks in the concrete and can be performed using several different methods, including epoxy coatings and sand-topping. For more severe damage, patching and routing is often required. The choice of which method to use will depend on the severity of the damage and the extent to which it affects the integrity of the structure.
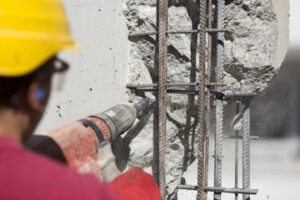
Crack routing is a nonstructural repair technique that consists of enlarging the crack and filling it with a sealant or filler (photo 3). This method is best suited for active or dormant cracks. It can be used in conjunction with a wide variety of fillers and sealants, from epoxies to polyurethanes. The selected material should be compatible with the cracks to prevent deterioration of the repaired surface and provide a long-term solution.
Before repairing cracks, it is important to properly prepare the area. The cracked surface should be cleaned thoroughly with a pressure washer, shop vacuum or brush to remove any debris in the crack. This will ensure that the repair materials adhere to the concrete. It is also essential to ensure that the concrete is dry before beginning the repair process. Having moisture in contact with fresh concrete can cause the material to fail, or result in spalling.
Routing and sealing is a simple, low-cost method to repair small cracks in exterior concrete. It is important to use proper safety precautions when working with any concrete repair material, as direct contact can lead to chemical burns. It is recommended that you wear eye protection, nitrile gloves and a dust mask.
Crack Stitching
In masonry wall systems, crack stitching is one of the most popular methods for fixing structural movement issues. It involves inserting stainless steel ‘helical bars’ into slots that have been cut in a cleared mortar bed or brickwork, then bonding them with HeliBond to stabilize the cracked masonry structure. This method is quick, effective and causes minimal disruption to the building. It is ideal for restoring stability to stepped or diagonal cracks in masonry walls which are often caused by rusted lintels or movements in the ground, but can also be used in a wide variety of other applications.
The helix of the helical bars provides excellent resistance to tensile stress and minimises any future cracking, unlike simple injection methods which can cause fatigue in the concrete over time. Stitching also provides additional reinforcement within the concrete to minimize lateral movement of the slab.
Stitching is a fast and cost-effective solution to repairing concrete cracks in both new and existing structures, even on damp substrates. It can be applied as a stand-alone treatment or prior to the application of an overlay system for concrete.
Before deciding whether or not to use crack stitching, we recommend getting a structural engineer to inspect the building and give you an assessment of the existing conditions. It is important to find out if the cracks are active, and if so, what is triggering them. This could be a range of things including lintel failure, movements in the ground, de-bonding mortar joints and water penetrations.
A carbon fiber stitch is far stronger and more flexible than a standard metal staple, so it has the capacity to better resist bending stresses, and can offer more surface area for bonding. This is important because the holding strength of a staple or stitch in concrete depends on its surface area, not just its tensile strength. This is why carbon fibre stitching is a superior choice for concrete repair and strengthening! Unlike traditional staples, which are only held by their own tensile strength, carbon fiber stitching is bonded to the concrete through its entire cross section. This makes it much more resistant to tensile stress and significantly increases the lifespan of your structural concrete repairs.
Sika Crack Sealer
Sika crack filler is designed to heal non-moving cracks and gaps in concrete and masonry. It is a cold cure, thixotropic epoxy resin adhesive with deep penetration and firm bonding. It is easy to use with its convenient side-by-side cartridges that fit a standard caulking gun. It also adheres well to a wide variety of substrates and is moisture tolerant. It conforms to ASTM C-881 and AASHTO M-235 specifications.
Choosing the right concrete repair product depends on the size of the crack and where it is located in the structure. Small cracks that are hairline in width should be filled with a concrete caulk or sealant, while larger cracks and honeycomb areas require dry pack mortar for repairing. The concrete crack filler should also be flexible enough to give slightly with ground movement or expansion/contraction to prevent further enlargement of the cracked concrete.
Another important consideration is whether or not the concrete repair product will withstand weather conditions that can cause further damage to the structure. Moisture is a major factor in the formation of cracks, and it’s necessary to choose a filler that will resist moisture. This will help prevent the cracks from reopening when it rains or snows, which can lead to further deterioration of the concrete surface and structure.
Once the concrete crack filler has cured, it’s essential to protect it with a concrete coating. This can help to preserve the filler, prevent stains and other environmental damage and make maintenance easier. The best concrete coatings also provide protection from graffiti, fly posters and other common types of environmental damage that can be difficult to remove once the concrete is set.
It’s important to repair concrete surfaces as soon as they show signs of deterioration, as this can significantly reduce the cost and time needed for future repairs. In addition, a smoother concrete surface is much safer for people in the household to walk on and can reduce the risk of slips and falls.
Taking the time to properly repair a concrete surface can greatly improve its longevity and increase its value. Using a Sika crack filler or other repair products will ensure that the concrete remains in good condition for years to come.
Concrete Patch
Concrete patches are a great way to patch cracks in old concrete and restore its strength, durability, and appearance. They can be used to repair a damaged concrete slab, prevent water from leaking into an existing foundation, fill in a hole in the wall, or fix a broken corner on steps. Concrete patches are available in a wide variety of colors, textures, and thicknesses, making them a great option for any surface. In order to choose the right concrete patch for your project, it is important to consider a few key factors.
A good quality concrete patch will be easy to work with and have a high durability rating. It should also be flexible and able to resist the impact of heavy traffic and weather changes. Additionally, it should be able to resist the damage caused by freezing temperatures and chemical spills.
Depending on the type of concrete patch you choose, it may have added grit or sand to make it easier to apply and blend into the surrounding concrete. This helps to make the patch look more like mortar or concrete, which is ideal if you plan on staining or painting the area. A trowel is a useful tool for blending in the patch, and you should always use caution to ensure that the patch doesn’t become too thick and cause further damage to the surface.
Stucco Repair – Why You Should Hire a Professional
Stucco Repair Philadelphia is a versatile and attractive exterior finish for homes. However, it can crack and damage over time for many reasons. It is important to inspect your stucco regularly, especially the corners around windows and any areas that have foam trim.
If you notice cracks or discoloration, it may be time for a repair. Remediation is more expensive than simple repairs, but it will solve the underlying problem and prevent future damage.
Stucco damage is a deceptive issue because it often goes unnoticed until it’s too late and you’re forced to hire a professional for a thorough inspection. It might seem minor, a hairline crack here or a discolored patch there, but the truth is, these symptoms can lead to serious moisture problems that can have a negative impact on the structure’s durability and lifespan.
Moisture damage starts with hairline cracks that gradually widen over time. These can cause further structural problems, such as rot or mold, if left unchecked. Thankfully, there are a few ways to mitigate this type of problem. Homeowners can invest in a quality sealant that can act as a protective barrier against moisture intrusion and temperature fluctuations. They can also ensure that gutters and downspouts are directing water away from the wall, as well as check that all flashing is intact.
Another easy way to keep moisture at bay is by coating the stucco with a special masonry paint that is both weather-resistant and waterproof. This will protect the surface from moisture and abrasion, preventing damage and preserving the beauty of the stucco for years to come.
It’s also a good idea to regularly inspect the stucco, especially after stormy weather. The freeze-thaw cycle can exacerbate small cracks and create further damage over time, so it’s important to be vigilant. Lastly, homeowners should be sure to check for any signs of mold or mildew. If you notice any, it’s best to scrub the affected area with a mixture of one part bleach to four parts water, wearing gloves and eye protection. Then, make sure to rinse and dry thoroughly before proceeding with a repair.
Other common weather-related issues include blistering, crazing, flaking and chalking. These problems are caused by the expansion and contraction of the paint, causing it to lose its adherence to the stucco. Water can seep into these cracks, creating further damage and resulting in further paint failure.
Fortunately, most of these issues can be prevented with regular maintenance and careful attention to the details. Stucco damage may not be covered by your home insurance, but there are public adjusters and attorneys who can help you get compensation from the contractors or builders who were responsible for the initial work on your property.
DIY Repairs
A stucco exterior requires a little more care than vinyl siding, but it’s still popular among homeowners. Whether you decide to handle stucco repairs yourself or hire a professional will depend on the extent of the damage and your comfort level with DIY projects. Using the right tools and understanding how to assess and repair damage is essential to keeping your home looking great.
Using a mason’s chisel and hammer, remove any loose pieces of stucco around the crack or hole in your stucco wall. You should also sand the area with a wire brush to ensure it’s smooth and clean before applying new stucco. It’s also important to check the condition of any metal mesh that may be present behind the damaged area. If this mesh is severely damaged or missing, you’ll need to replace it.
Small or medium-size holes in your stucco are typically easy to fix without a professional. You’ll need to purchase a kit that includes a stucco patching compound and explicit instructions on how to use it. Ensure the compound you select is suitable for the size of hole or crack you are repairing. It’s also best to apply the first coat of patching in the morning when it is cool so it doesn’t bake or shrink as it dries.
Once you’ve applied the primer coat, you’ll need to prepare your stucco mix. You can choose a pre-mixed repair product, or you can make your own with Portland cement, lime and sand. Follow the manufacturer’s instructions on how much mix you need per repair area. Remember that the mix dries fast, so you’ll need to work quickly once you start.
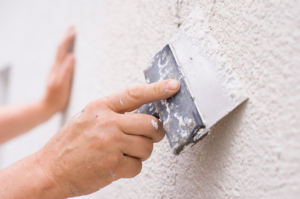
After applying the first coat of stucco, you should etch the surface with a putty knife or trowel. This helps the second coat of stucco adhere to the first, and it will help the final texture match the rest of your house. After applying a second coat, allow the patched area to dry for several hours before etching it again with your tool of choice. Once the patched area is completely dry, you’re ready to paint.
Hire a Professional
Stucco looks easy enough to put on your walls, but it requires the skills of a professional. If you hire a contractor to repair your stucco, they can save you time, money and trouble by doing the job correctly the first time. You can find a qualified contractor with a good reputation by asking smart questions. It is also a good idea to learn as much about stucco as you can so you can ask informed questions when interviewing potential contractors.
The location of the contractor is important, as the closer they are to your home, the more cost-effective it will be for them to transport their workers and materials. In addition, a local stucco contractor will be familiar with the specific threats that your stucco faces from moisture and pests in your area. They will know whether there are particular problems you may need to watch out for, such as excessive staining or soft spots that indicate water damage behind the surface.
A reputable stucco contractor will be licensed, insured and provide you with a warranty. This will give you peace of mind that they will perform a quality job for a fair price and will stand behind their work. They will be happy to answer any questions you may have, and will be able to explain how their products and services can benefit you.
Remember that when moisture seeps through cracked or damaged stucco, it starts a chain reaction that can damage the entire wall structure of your home. The continual flow of moisture will eventually cause mold, mildew and rotting wood which can affect the health and safety of your family. Mold exposure can cause a range of health problems, from respiratory issues to itchy or burning eyes and skin.
Regular inspections of your stucco will help you spot any problem areas before they get out of hand. Look for hairline cracks or larger ones, as well as stains and rotted wood. If you notice any of these signs, call a stucco contractor right away. They will be able to fix them before they worsen and damage the rest of your home.
Prevent Mold
Mold spores can be spread by wind or rain, but they can also become trapped behind the stucco surface. When this happens, the moisture can’t drain or dry, and it begins to rot the wooden wall studs and sheathing. This causes extensive structural damage that can cost tens of thousands of dollars to fix and is often not covered by homeowners’ insurance.
The best way to prevent mold is to perform a visual and physical inspection of your stucco once a month. Look for cracks, holes, chips and discoloration. Make sure to examine any areas where water could have gotten in, such as behind your gutters, around windows and doors or near the base of the walls. Mold tends to grow in moist regions, so check carefully around any shrubs, flowers and trees that may be growing near your building.
If you notice any areas of mold, wash the affected area with a gentle cleaning solution such as oxygen bleach. This will kill the spores and help prevent them from returning. If the mold is widespread or persists, a professional may need to come in and treat the entire area with mold removal chemicals.
Water damage is another major problem that can lead to mold. If the stucco was installed incorrectly or is prone to leaking, water can seep into the interior and cause serious problems, including mold.
A professional should inspect the underlying lath and sheathing to ensure that there are no signs of rot or water damage before repairing the stucco. If the sheathing and studs are in good shape, reinstalling new stucco with water-resistant barriers should keep mold from growing.
A common cause of water damage in stucco is misdirected rainwater. Gutters and downspouts can become clogged, causing water to pool and leak into cracks in the stucco. Regularly cleaning your gutters and downspouts can help prevent this issue, as can improving drainage around your home to reduce the risk of backyard flooding and excess moisture. Mold that makes its way between the exterior stucco and the framing of your house can damage walls and exacerbate allergies or asthma. If you notice any signs of mold on your stucco, take prompt action to avoid costly repair bills in the future.