Pest Control – Understanding the Different Types of Pests
Pests can damage structures, threaten human and animal health, and contaminate food. Hiring a pest control company can help lower these risks. Contact Pezz Pest Control now!
Correct pest identification is necessary for an effective pest control program. Certain geographic features, such as mountains and large bodies of water, restrict pest movement.

Resistant varieties of plants, animals and woods can keep pest populations below damaging levels. Pheromones can also be used as a control tool.
Pest Identification
Correct pest identification is a necessary first step in any effective integrated pest management (IPM) program. Identification can be done visually or by trapping and scouting for insects, mollusks, weeds, vertebrates, or microscopic organisms such as nematodes and pathogens. Incorrect identification can result in selecting inappropriate control tactics, which can cost time and money as well as expose people or the environment to unnecessary risks.
For IPM programs, monitoring of pest populations is conducted to determine whether damage occurs or pest numbers reach threshold levels that require control. Monitoring pests can also include examining environmental conditions such as temperature and humidity, which may affect population growth or increase the susceptibility of crops or collections to a given pest.
Field scouting is often the most important monitoring tool for pests in a crop. Monitoring methods vary by pest type, but scouting generally involves walking through the field and looking for signs of infestation. Scouting early in the season and concentrating sampling in fields where pests have historically occurred tends to detect pests before they reach damaging numbers or spread.
Insect identification is usually based on the order to which an insect belongs, such as Lepidoptera or Coleoptera. However, a more detailed level of identification is required for use of some biological insecticides, such as Bacillus thuringiensis products that work on a specific insect order or species like Chrysanthemum leafminer (Liriomyza trifolii).
Once monitoring, identification, and action thresholds indicate that pest control is needed, IPM programs evaluate the proper control method both for effectiveness and risk. Less-risky controls, such as pheromones to interrupt mating or mechanical and physical control, are considered before the application of more-potent chemicals, such as insecticides or herbicides.
If you are unsure of the identification of a pest, contact your local County Extension Service or a pest control professional. Many of these professionals have experience with a wide variety of pests and can assist in proper identification as well as develop an effective treatment strategy. Other options for identifying pests include the Internet and various pest identification guides. Some of these guides are free, while others require payment for a subscription.
Prevention
Prevention is a proactive approach to pest control that focuses on denying pests the things they need to thrive. It includes sanitation and cleaning practices, sealing entry points and eliminating attractants like food sources. It also includes regular inspections and monitoring. The goal of preventative pest management is to reduce reliance on, and the associated risks of, chemical pesticides. This is sometimes called integrated pest management (IPM).
Pests can pose a health threat to humans and pets. Many carry disease-causing pathogens, allergens and toxins. They can also cause damage to wood, fabric, wires and personal items. Pests can also create unpleasant odors and stain or discolor surfaces.
Insects are the most common pests that pest control companies deal with. These include ants, cockroaches, bed bugs and fleas. Rodents are another frequent pest problem that pest control professionals deal with. Other insects that are problematic include silverfish, earwigs and millipedes. Fungus and molds are often considered to be pests, as well.
Keeping a home or business free of pests can help preserve its value, and it can also protect the people living there from a variety of threats. Pests can carry and spread disease-causing pathogens, allergens or toxins, and they can damage property with their burrowing and chewing habits. They can also damage wood, fabrics and other items in homes and offices.
Physical pest control measures, such as traps and baits, are often used to remove pests once they are present. However, this is only effective in the short term and it may not prevent future infestations. Preventative pest control, on the other hand, can be more long-lasting.
It can involve sealing the smallest cracks and crevices that pests might use to gain entry into buildings. It can also include ensuring that garbage receptacles are securely closed, and that landscaping is maintained in ways that doesn’t encourage pest pathways. Regular inspections by pest management professionals can identify and resolve problems early.
In addition, a preventive pest management plan might include the introduction of natural enemies to a targeted pest population. These might include parasites, predators or other organisms that will feed on or attack the pests. The goal of biological pest control is to increase the number of natural enemies so that the level of pests in an area declines without the need for any chemical treatments.
Treatment
Pest control is a practice that seeks to manage the presence of different types of pests in order to minimise the impact they have on our lives and the wider environment. Pests can cause disease, damage property and disrupt food chains or habitats. They can also frighten or upset people, for example by their fierce, scary or grotesque appearance (like spiders, silverfish and earwigs) or by biting, stinging or scratching (like fleas, cockroaches and cluster flies).
Pesticides are often used to kill or repel pests. Some pesticides are sprayed onto surfaces, whilst others are injected or poured into spaces. There are also a number of ‘non-chemical’ pest control methods that can be used, such as traps and baits, to discourage or kill pests and their offspring.
It is important to know that pesticides can be dangerous, especially to children and pets. Therefore, if you choose to use pesticides yourself, make sure you do your research and select the right product for your needs. If you are hiring someone to apply chemicals on your behalf, be sure they have a pest control licence and always follow their advice carefully.
Regular inspections by a professional can help you to identify and monitor pest problems, allowing them to be managed before they become a major issue. Typically, scouting (searching for and identifying pests) or trapping will be conducted to determine how many pests are present and what damage they have caused. Monitoring usually takes place on a routine basis, such as weekly or monthly for insect and insect-like pests, fortnightly or bi-monthly for mollusks, and weekly for weeds.
Sanitation practices can reduce the number of pests by removing their food sources or hiding places. These include improving rubbish collection, cleaning up spills and removing waste material from outdoor areas, and preventing water leaks in buildings and structures. The use of clean seeds and transplants can also reduce the carryover of pests between crops. Control of pests in livestock and agricultural situations can be achieved by careful management of manure, reducing feed waste, and decontaminating equipment before moving it from one area to another.
Eradication
Eradication is the elimination of a pest population to the point that it can no longer recolonize an area. It can be accomplished through the use of natural enemies such as parasites, predators and pathogens; or by introducing enemies that were not present in the area before, such as insects repelled by pheromones and hormones. Eradication may also be achieved by altering the environment to make it less suitable for the pest, such as by eliminating habitats or destroying the food supply that it needs to survive.
A number of factors influence the success of eradication campaigns, including reaction time, the extent and spatial structure of the infested area and the implementation of critical sanitary measures. The probability of successful eradication was significantly higher when the campaign was initiated within 11 months after the first sighting, and for outbreaks in man-made habitats, e.g. greenhouses, a high level of eradication was achieved (Terminal Node 2). Eradication campaigns were more likely to be successful at local rather than at regional or international scales. This is likely a result of the fact that control efforts can be more efficiently coordinated at local scales.
Whether to implement an eradication program or a suppression strategy depends on the amount of damage caused by the pest, the cost and difficulty of eradicating it, and the value of not having it around. The cost of future infections and vaccinations is projected forward, and these values are discounted to give an estimate of the “dividend” that eradication would provide. If this dividend is greater than the costs of eradication, it would be considered a sound investment to eradicate the pest.
Some invasive foreign plants are exceptionally detrimental to agriculture and to wildlands. These include weeds that overrun fields and pastures, and those that invade forests, riparian corridors, estuaries and other natural areas. In California, for example, a special eradication program has targeted these noxious weeds that taint hay and other crops and rob the native vegetation of nutrients.
Eradication is difficult, and most attempts fail. Some reasons for failure include the speed at which a pest breeds, the difficulty of monitoring an infestation, policy and funding issues that slow the response to an outbreak, and insufficient knowledge about the biology and ecology of the pest.
Ceiling Repair Tips For Homeowners
Ceilings are subject to significant stress over time, manifesting in cracks, stains and plaster damage. Recognizing these signs of damage early and addressing them promptly helps homeowners minimize the extent of required repairs. Reach out to Ceiling Repair Perth for expert assistance.
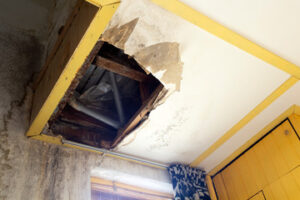
Begin by determining the cause of the problem, whether it be structural settling, temperature fluctuations or water damage. Water stains typically indicate a leak, which needs to be identified and resolved to prevent further staining or structural damage.
As a property owner, you may notice cracks in your ceiling that cause you concern. These cracks can range from minor cosmetic issues to structural problems that require prompt attention. It is important to know what warning signs to look for so you can work out whether the cracking is cosmetic or if it’s indicative of a more serious problem that needs to be addressed as soon as possible.
Many people worry that cracks in the ceiling are a sign of serious structural damage, but this isn’t always the case. It is very common for homes to develop minor cracks over time, especially as the building settles and shifts. This is normal and can be caused by a number of factors, including changes in weather and humidity, water leaks, plumbing issues and underlying problems with the foundation.
If a crack is located close to the edge of the wall or where the walls and ceiling meet, it can be a sign that there is moisture in the wall that has shifted or moved the structure. However, cracks that are concentrated in a small area and appear to be getting wider over time could be an indicator of a more serious problem. In these situations, it is important to contact a structural engineer as soon as possible to discuss your options.
Aside from causing aesthetic concerns, cracks in the ceiling can also create health and safety issues. This is because dust and dirt can build up in the cracks, leading to respiratory problems for anyone living in the home. In addition, water can seep through the cracks and cause mold growth that may affect indoor air quality.
Before you begin working on repairing a crack in your ceiling, it’s a good idea to lay down a tarp or sheet of plastic in the room where you will be working. This will help to catch any loose debris, mud or paint that could fall on the floor and make cleaning up much easier. You should also remove any furniture from the room and make sure you have a sturdy ladder that is suitable for climbing on the ceiling (for example, an A-frame ladder). You should use a ladder with a handrail for added safety.
Stains
Stains on ceilings are not just an eyesore; they can be a sign of major problems with your home, such as a leaky roof or a malfunctioning HVAC system. In some cases, water stains in ceilings can also indicate that you have an infestation of mold or mildew, which can be very unhealthy for you and your family. In order to prevent additional damage and health concerns, you must address the staining as soon as possible.
Water stains in ceilings are generally a result of some type of leak, such as a roof or plumbing leak, that seeps through the ceiling and evaporates, leaving behind discolored mineral deposits. If you cover up a water stain without addressing the leak, you risk re-occurring the problem and potentially serious structural or electrical damage.
In order to remove a water stain, you must first identify the source of the leak. This may require a professional to assess your home and make the necessary repairs. Once the source of the water stain is fixed, you can proceed with removing the stain and painting your ceiling.
Start by putting down a drop cloth below the stain and propping up a ladder to reach it. Next, put on some protective gloves and a pair of goggles to keep your eyes safe. Using a rag or sponge, wipe down the stain with a mild bleach solution (one cup of bleach to three cups of water). This will help fade the water stains and clean any lingering dirt, mildew, or grease that can interfere with the adhesion of primer and paint.
Once the stain is cleaned, you should apply a stain-blocking primer in a shade that closely matches your ceiling color. This will ensure that your new coat of paint will not bleed through the stain and will allow the rest of your ceiling to stay in pristine condition. Once the primer is dry, you can begin painting your ceiling. Make sure to apply two coats of paint to get complete coverage and to allow the second coat to fully dry in between application.
Peeling Paint or Wallpaper
Paint peeling on walls or ceilings is not only unsightly, but it can also be detrimental to your health by causing you to inhale paint dust and chips. It is a common homeowner’s problem, but it can be easily remedied if you know what to do and take the proper precautions.
There are several reasons why your paint may be peeling, but the most common is moisture. Moisture from the humidity in the air, condensation or water spots on your ceiling can release the coating and cause it to flake or peel. This is especially a problem in rooms that are frequently used, such as washrooms, where there are high levels of moisture.
Another reason your paint may be peeling is that the paint was not properly prepped before it was painted. The surface needs to be smooth and free from dirt or debris to ensure a good bond with the new coating of paint. The temperature in your home can also impact whether or not your paint will peel. It is best to keep the temperature in your home consistent, as fluctuations can cause your paint to peel.
If you notice any areas of peeling, the first thing you need to do is remove the loose paint. Be sure to wear a mask and goggles while doing this, as it will protect you from paint particles and other potentially hazardous materials. Once the area is clear, you can use a putty knife to apply spackling compound to the cracks and dents in your ceiling. Allow this to dry overnight, and then sand the area until it is smooth.
Now that the spackling is dry, you can prime and repaint the ceiling. It is important to use a quality product that is designed for your type of ceiling, as this will help the new coating adhere well. Remember to follow the instructions on your paint can, as these will provide you with the best results. With the right preventive measures, quality products and careful preparation, you can enjoy a long-lasting, beautiful, peel-free ceiling in your home.
Water Damage
Water damage is not only unsightly, but it can lead to structural issues in your home and mold growth that poses health risks for your family. If your ceiling is sagging, bulging or showing signs of water damage, it’s time to call in a professional to help minimize any further damage and address the problem.
The first step in any water damage situation is to find and shut off the source of the water. This can be done by closing the hole in the roof, patching shingles or covering any pipes through which water is leaking into your house. Once this is done, it’s important to allow the area to dry thoroughly, which can take quite a while in some cases. This can be helped along by opening up the windows and using fans to move the air around.
It’s also a good idea to place buckets or pails under any areas that are dripping to prevent further water damage to your flooring and belongings until the area can be repaired. This can be especially important if the ceiling is located over an active plumbing fixture or in an upstairs bathroom, where any leaking water could cause significant problems.
Another sign of water damage in your ceiling is peeling paint or wallpaper, which happens when the materials begin to deteriorate due to prolonged moisture exposure. This can expose the plywood, ceiling joists or roofing material above to water damage and potential mold growth. In some cases, the peeling may be so severe that you can actually see the wood underneath.
Seeing water stains in your ceiling is a surefire sign that the materials are becoming saturated with moisture and will eventually degrade and develop structural problems or mold. This is particularly true if the water stains are near rooms that contain plumbing fixtures or in an area where rainwater has collected due to leaky roofs.
While some water stains and cracks can be fixed with simple plaster repairs, other areas may require drywall replacement. A professional water damage mitigator and restorer can help you determine whether the underlying materials are salvageable or need to be replaced entirely. They can also assess the extent of any structural damage and recommend additional repairs.
The Importance of Having an Accident Lawyer on Your Side
Car accident lawyers deeply understand insurance laws, including the nuances of policies and coverage limits. They also know how to negotiate with insurance companies to secure maximum client compensation.
They assess the evidence to identify liability and calculate damages. They handle all communication with the insurance company, preventing clients from accidentally compromising their case by admitting fault or accepting low settlement offers. Click the Best Accident Lawyer Duluth to learn more.

When you are involved in a car accident, evidence is essential. It can help you get fair compensation for your injuries and damages. However, securing this evidence can be challenging, especially while you are in pain and dealing with mounting expenses. An experienced attorney can help you gather and preserve evidence to support your legal claim.
Documentation of the Scene
The first step to building a strong case is documenting the incident as soon as possible. This includes photographing the scene of the accident, your injuries, and any damage to your vehicle or property. It is also important to note any weather conditions or road conditions that may have contributed to the crash.
Detailed medical documentation is also essential. This includes the initial diagnosis, treatment plans and any ongoing care you require. It is also helpful to document the impact of your injuries on your daily activities, including sleep habits, work performance, and family life. Bills and receipts are important as well, as they demonstrate the financial burden an accident has imposed on you.
Witness statements are another valuable source of evidence. Obtaining statements from people who saw the accident can help establish critical details such as how the collision occurred and who was responsible. It’s important to reach out to witnesses as soon as possible after a crash, before their memories fade and their stories become conflicting.
Accident reconstruction experts are also helpful in establishing the cause of a crash. They can provide expert opinions on the cause of a collision as well as how it may have been prevented. It’s important to hire an accident reconstruction expert as soon as possible, so that they can begin their investigation before any evidence is lost or destroyed.
You should also collect copies of all relevant insurance documentation. This includes the policy for the other driver involved in the crash, your own insurance policy, and any homeowner’s or health insurance coverage you have. It’s also a good idea to request a copy of the police accident report. This report provides an official account of the crash and can be useful in supporting your case when negotiating with the insurance company or going to court.
Negotiating With the Insurance Company
After a car accident, it is common for injury victims to need to file an insurance claim. This can cover a range of damages such as medical bills, lost wages, and pain and suffering. However, it can be difficult to negotiate with the insurance company and receive a fair settlement for their claim.
An experienced lawyer knows how to effectively deal with insurance companies to resolve a car accident claim. They can assist with assessing the potential for an adequate settlement and may recommend taking the case to court in cases where settlement negotiations are not successful.
The legal process of resolving a car accident claim can be lengthy, and the outcome depends on many factors. Your attorney can help you understand the complexities involved and may be able to speed up the process by handling all communication with the insurance company on your behalf. This can save you time and stress after an accident.
When negotiating with the insurance company, it is important to remember that their goal is to minimize the amount they pay out on claims. They will likely begin the negotiation with a low offer, which is why it’s critical to reject this initial offer and demand that they pay you for your losses. It’s also a good idea to get the offer in writing to ensure that you’re getting what you deserve.
Most lawyers work on a contingency basis, which means they don’t charge any upfront fees. Instead, they accept a percentage of any compensation they secure for their client. This can vary from 25 percent at the lower end of the spectrum to 40 percent or more at the higher end.
It is also possible for victims to pursue punitive damages if their injuries were caused by particularly egregious conduct on the part of the at-fault party. Punitive damages are typically available only in very rare cases and serve as a way to punish the wrongdoer for their actions. It’s best to consult with an experienced attorney if you want to pursue punitive damages. They will be able to assess the circumstances of your case and determine whether you have a strong argument for these damages.
Filing a Lawsuit
Car accidents can leave victims with significant and ongoing medical expenses, a loss of income and other financial damages. These are often difficult for accident victims to overcome, but filing a lawsuit can help them do just that. A personal injury claim can also include compensation for pain and suffering, mental anguish, and a decreased quality of life caused by the accident and its resulting injuries.
The process of resolving a claim may take some time. During this time, your attorney will thoroughly evaluate your case and compile a claim statement outlining the incident, your injuries and losses, and their impact on your daily life. They will then file this with the at-fault party’s insurer, which will initiate the negotiation process.
If the insurance company offers a settlement that is close to your valuation of the case, it may make sense to settle and avoid a lengthy court trial. On the other hand, if the offer is substantially less than you believe your case is worth, it’s likely in your best interests to fight for what you deserve.
When the insurance company fails to make a fair offer or denies your claim altogether, it’s time to file a lawsuit. Your lawyer will send a demand letter to the insurance company, which will include a monetary figure representing the value of your collision-related losses and request payment for said amount. The letter will also inform the insurance company that, should they fail to settle your case, your attorney will not hesitate to file a lawsuit.
Your attorney will conduct further research to support your claims and gather additional evidence to strengthen your case. This may include working with experts and other witnesses to provide testimony, as well as requesting records from any medical treatment you received or are receiving.
Having a competent New York car accident lawyer by your side can ease the confusion of the lawsuit process. While each accident lawsuit is unique, understanding the steps involved can help you feel more confident and comfortable throughout the proceedings. Your lawyer will be your biggest ally and will support you every step of the way.
Trial
In the event that the insurance company is unwilling to offer a reasonable settlement, an accident lawyer can take your case to trial. This strategy can increase the amount of compensation you receive for your losses. However, most cases are settled outside of court.
Car accident attorneys prepare their clients for trial by establishing the foundation of the claim with strong evidence that supports their argument. They conduct an investigation of the accident scene and review medical records to establish a clear link between their client’s injuries and the accident. They also carefully analyze insurance policy coverage to leverage maximum benefits.
They consult expert witnesses, such as accident reconstruction specialists and medical professionals, to add credibility to their arguments. Then, they craft persuasive narratives that showcase the full extent of a victim’s harm and losses. Finally, they make compelling arguments in court to win favorable outcomes.
Damages in car crash cases can cover a wide range of expenses. Economic damages may include current and future medical treatment costs, lost wages due to missed work, property damage (such as repair or replacement cost), and vehicle rental costs. Non-economic damages may include pain and suffering, loss of enjoyment of life, or a wrongful death claim. In rare cases involving particularly egregious conduct, a jury may award punitive damages.
The trial process typically involves opening statements from both parties. Then, evidence is presented in the form of photographs, video, witness testimonies, expert opinions, and medical records. The plaintiff and defendant then deliver closing statements before the judge or jury deliberates and renders a verdict.
A successful car accident trial requires meticulous preparation and an unwavering commitment to client interests. At Leav & Steinberg LLP, our NYC accident lawyers are committed to helping victims fight for the full amount of compensation they deserve. Moreover, our contingency fee dynamics incentivize our firm to maximize payouts. To do so, our car accident attorneys work efficiently and effectively to gather and analyze evidence, consult experts, craft compelling arguments, and present these facts in court to win favorable outcomes. To learn more about how our attorneys can help you recover the damages you are owed, contact us today for a free consultation.
Pest Solutions For Your Home
The home is where most people sleep at night and one of the biggest financial investments many will make in their lifetime. Your home deserves protection from pests that can cause damage, spread disease, and spoil food.
Preventative steps, such as removing food sources, sealing entry points, cleaning and decluttering, and fixing leaky plumbing, are the first steps in pest control. Click the https://www.apexpestky.com/ to learn more.
Before implementing a pest management strategy, accurately identifying the pest species you are dealing with is important. This will help you decide if pest control is necessary and the most appropriate treatment. Incorrect identification of a pest may lead to unnecessary chemical applications that will only cause more problems than they will solve.
Their droppings or characteristic damage can often identify pests to the plants that they consume. A close examination of the damage can also provide valuable clues as to what species is responsible for the problem, which can narrow down your list of possible suspects. Many of these critters also carry diseases that can pose a health risk to those who come into contact with them, and the sooner you know which pest is infesting your facility, the quicker you can take steps to eradicate it.
Some pests look very similar to one another throughout the course of their life cycle, making it difficult to tell them apart by appearance alone. This makes it important to look for other characteristics that distinguish one pest from another, such as their behavior, feeding habits, egg laying methods and reproductive stages. It is especially crucial to be able to identify a pest species to order, as certain biological insecticides like Bacillus thuringiensis are only effective against specific orders of insects.
Performing regular insect scouting can help you to get familiar with the patterns of your pest population. Knowing what they prefer to eat and when they are most active will allow you to detect them before their numbers build to damaging levels and prevent them from becoming resistant to sprays.
It is also a good idea to check for entry points into your facilities. This can include cracks, gaps and crevices around doors, windows, vents and utility lines. Use caulk or expanding foam to seal these openings. Be sure to look for any potential nesting areas where these pests are hiding, as they can lay eggs in the smallest of spaces. If you are unable to identify the pests that are infesting your facility, consider calling in a professional pest control company to help you out.
Pest Prevention
A pest infestation can be devastating for homeowners. Pests cause health issues for family members, damage furniture and clothes, contaminate food, and can start fires by chewing through wires. Rather than trying to treat an existing pest problem, it’s important for families to take proactive steps to prevent pests.
The most effective method of preventing pests is to remove their sources of food, water and shelter. Store food in containers with tight lids and keep garbage cans tightly covered. Clean out sheds, closets and storage areas regularly to keep pests from nesting in these inconspicuous places.
In commercial facilities, developing and adhering to a Master Sanitation Schedule is one way of maintaining cleanliness. This includes cleaning all interior surfaces that pests could find attractive, such as floors, walls and ceilings. In addition, a facility should maintain its structural integrity and not allow leaks to develop that could attract pests.
Conducting regular, thorough visual inspections can also help prevent pest problems. A trained pest professional can use data from traps and monitors to guide the scope of an inspection. For example, rodent activity in traps or high numbers of stored product pests in pheromone monitors should trigger a more thorough inspection of that area.
For residential properties, close attention should be paid to exterior windows and doors. These are the most common entry points for pests. Seal any cracks or openings that may be large enough to support pests, such as around window frames, and apply caulking or weather stripping to any gaps. Examine each external door, including roller doors, to ensure there is no gap underneath it where a pest can crawl inside.
The outside of a home should be free of clutter and wood piles that can provide rodents and spiders with hiding spots. It’s also a good idea to trim tree limbs and shrubs away from the house, as these can be used for highways of access to the roofline and the foundation. It’s recommended that a homeowner install gutter guards to prevent debris from collecting in the gutter and blocking the flow of rainwater.
Pest Control
Pest control is the elimination or management of unwanted creatures such as rodents, cockroaches, bed bugs and spiders. Pests can cause damage to plants, crops, and property, such as buildings or structures. Proper identification is the first step in pest control. Pests can be prevented by examining areas that provide shelter, food and water, or that support the pests’ life cycle, and by checking for signs of infestation such as muddy trails, gnawed wood or insect tunnels in wood. It is also important to inspect a facility regularly for possible points of entry by pests, such as windows, doorways, vents and cracks in walls.
If prevention is not possible, monitoring is the next step in pest control. Monitoring is the process of checking for pests and evaluating the population levels, abundance and damage caused by the pests. This information helps in the determination of whether a pest can be tolerated or if control measures are necessary. Monitoring also provides vital information on which control methods to use and when to use them.
Pests can be controlled through a number of means, including physical removal, chemical controls, and biological controls. Biological controls include using predators, parasitoids, and pathogens to prevent or destroy pest populations. These methods may be used alone or in combination with other control methods.
Chemical controls include the use of pesticides. Pesticides are highly effective in controlling many common pests; however, they must be used responsibly to minimize risks to people and the environment. When selecting a pesticide, read the label carefully and follow instructions and warnings to ensure proper application and safe handling.
Mechanical controls, such as traps, screens, barriers and fences, are often used to prevent pests from entering a field, landscape or building. Altering the environmental conditions, such as temperature, lighting or humidity can also be used to control some pests. For example, using a dehumidifier to reduce moisture in the soil can help control some insects and diseases. Microbial pesticides, such as Bacillus thuringiensis or Bt, are also available and have the advantage of being safer to humans than traditional chemicals.
Pesticides
Pesticides are substances that prevent, destroy, repel or mitigate pests. They can be found in many forms, including liquids, gases and vapors. These chemicals can be sprayed onto plants or into the air to control insects, weeds and other organisms that harm landscape features and crops. They are sold in lawn and garden centers, hardware stores and some grocery stores.
When choosing a pesticide, look for the least toxic alternative. Always read and follow label directions. Avoid mixing pesticides, which can result in unpredictable reactions and increased toxicity that could harm humans, pets or wildlife. Never apply more pesticide than the label recommends. Excessive use wastes money, time and energy, while increasing the likelihood of plant injury and environmental contamination.
The type of pesticide to use depends on the cause of the problem. The most common pesticides are herbicides, insecticides and fungicides. A herbicide kills only the target plant; an insecticide kills only insects, weeds or rodents; and a fungicide kills molds.
Before applying a pesticide, increase ventilation in the treatment area and move people and pets away from the site until it is safe to return. Wear protective clothing, masks or respirators as directed on the label. When spraying, keep the solution away from electric outlets and switches since it can conduct electricity.
Many people are exposed to low levels of pesticide residues in their homes, schools, workplaces and other facilities. Some people may have a more acute response to pesticide exposure than others, especially the elderly, children and those with preexisting medical conditions.
The amount of pesticide residue left behind after an application depends on the rate of application, weather conditions, equipment used and other factors. Strict compliance with the label’s application rates, reentry intervals, safety equipment requirements and aeration periods should leave relatively low levels of residue. Excessive residues may damage desirable plants and leach into groundwater or surface water, contaminating the environment.
What Is Real Estate?
Real Estate includes land and the permanent man-made structures attached to it, like homes or offices. It also encompasses zoning laws, land developers and the professional services that keep the industry running smoothly.

Direct investment in real estate usually involves buying a property and renting it out. However, returns are not guaranteed.
Land refers to a specific piece of earth with clearly defined boundaries that has an owner. Real estate, on the other hand, encompasses land and any permanent man-made additions to it like houses or buildings. Those additions, called improvements, add value to the land.
A person can buy land and build whatever they want on it as long as they follow local zoning ordinances and laws. For example, if a piece of land is zoned for single-family homes, the property owner can’t build a 40-story office tower or smelly factory on it.
Those who buy raw land are usually looking to develop it for commercial, industrial or residential purposes. Developing land can be expensive and there are risks associated with it, but the potential profits can be significant.
There are a number of factors that affect the valuation of land including its location, size, climate and the physical structures on it. Natural resources located on a piece of land can also increase its value. For example, land that contains oil or gas is much more valuable than an empty parcel of dirt.
The location of land can be especially important for a business. If a company owns property that is close to public transportation, hospitals, schools and other businesses that serve customers, it can attract clients and increase sales.
When a business sells its real estate, it usually gives the buyer a deed with a description of the property that includes the zoning restrictions and other limitations. The deed usually includes a record of the property’s history of ownership.
A real estate agent can help a client find the right property for their needs, negotiate prices and contracts and handle all the details of a sale. A good real estate agent can also offer advice on obtaining financing for the purchase.
In the real estate industry, a person can get a good idea of the market value of a piece of land by comparing it to similar properties that have sold in the area. Using an appraiser to determine the property’s value can be expensive. Some companies sell online access to real estate data that can be used for appraisals without the assistance of an expert.
Property Rights
Property rights are the entitlement people have to use, manage, and profit from a particular good or resource in an organized market. Those rights are secured by laws that clearly define ownership and any associated benefits. While property rights aren’t necessarily absolute, they can’t be violated without legal consequences.
Real estate buyers typically purchase a bundle of rights when they buy land or property. The traditional bundle of rights, a concept featured on many real estate license tests and first-year law classes, encompasses the right to possess, control, exclusion, enjoyment, and disposition.
Those rights are generally defined by state and local laws, which can change over time. For example, state laws dictate what you can and cannot do on your land, and local laws govern how you use your property. This is why if you want to build a fence or hang a no-trespassing sign, you need to check your local laws to ensure you’re not violating any regulations.
A well-defined and protected property rights system allows an individual to build a home, open a business, and create jobs for the community. This economic growth is made possible through the protection of a land title and the ability to secure a loan using it as collateral. It’s also important to note that a property’s value can be increased through proper maintenance and care.
However, property rights can be abused when someone else attempts to use it without permission or for illegal purposes. The fundamental purpose of property rights is to replace destructive competition for economic resources with a healthy one based on monetary exchanges. Those who advocate the abolishment of property rights are generally opposed to private ownership and want to transfer them to government control.
Despite this, property rights reform programs can be successful at improving living conditions in impoverished countries. The key is to find a program that is effective at achieving these goals while also maintaining the property owners’ sense of dignity and independence. This is a challenge, but it’s one that must be taken. Taking on the challenge will improve the lives of the world’s poorest citizens and contribute to a more sustainable economy in the long run.
Marketing
Real estate is an important business, and it’s crucial for real estate agents to understand the latest marketing trends. The right strategies can help agents generate more leads, increase their visibility online, and grow their businesses. Understanding these trends can also help real estate agents create high-quality, effective marketing campaigns that will improve their odds of selling properties.
A successful real estate transaction is a complex process that involves a lot of moving parts. From finding the right home or office space to navigating zoning regulations and contract negotiations, there are many steps involved in a real estate sale. It is important to hire a professional to guide you through the process and ensure that all details are taken care of. Real estate agents can also benefit from partnering with a real estate marketing company that offers a variety of services.
The real estate industry is experiencing a period of transition as it moves from a traditional brokerage model to more of a consultant role. As a result, real estate agencies need to focus on providing consolidated, easy-to-understand data that will enable them to make informed recommendations to clients.
In addition to focusing on data, real estate agencies should focus on building relationships with potential and current clients. For example, they can host events like client appreciation parties or homebuyer workshops to engage with their audience and build trust. These events will help to generate word-of-mouth referrals, which is the best way to gain new clients.
Another important trend in real estate marketing is the increased use of social media. Agents should focus on creating content that is relevant to their local markets, and they can also leverage tools like MLS integration and apps to expand their reach online. Additionally, they should use social media to promote their listings and create engaging posts about the community.
Moreover, real estate agencies should optimize their websites for local SEO. They can do this by adding a Google Business profile and including information about their services, location, and hours of operation. They should also include keywords that their audience uses when searching for information about real estate in their area.
The Practices of Pest Control
Pests like rodents, ants and bees can damage your property and spread diseases. Some also carry harmful bacteria that can contaminate food and surfaces in your home, or deteriorate plants.
Columbia MO Pest Control professionals work to minimize pest populations to acceptable levels through scouting, monitoring, suppression and eradication. Whenever possible, they use non-toxic treatments.

The first step in pest control is to prevent the pests from entering your establishment. This can include closing doors, windows and screens. This can also mean inspecting food shipments and preventing rodents from chewing through them. It may involve removing clinging or sticky materials that attract pests like fruit, sweets or discarded pet food. This can also include securing or blocking openings through which pests enter buildings such as holes, cracks and crevices.
Preventing Pests is usually easier than controlling them once they become a problem. Continuous pests are fairly predictable if you know their environmental requirements. Sporadic and potential pests, however, are not always as easy to predict.
Prevention is the most cost effective method of pest control. It includes scouting and monitoring, with correct identification to determine whether pest populations have reached an unacceptable level. This can be done by regular inspections of fields, landscapes, forests, structures and buildings. It can also include regular scouting of residential and commercial outdoor areas by personnel responsible for groundskeeping and maintenance.
Once a pest infestation has been detected, the choice of the most appropriate control method depends on the extent of the problem and how quickly it must be dealt with. Some pests, such as a few wasps at your picnic table, might not require any action and can be tolerated, while an infestation of cockroaches in a restaurant kitchen might necessitate immediate control.
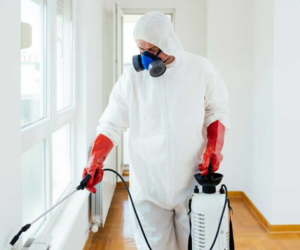
Whenever possible, you should try to avoid pesticides in sensitive areas such as homes or restaurants. If pesticides must be used, they should be applied sparingly and only as needed. This helps to reduce risks to humans, beneficial insects and other organisms that can be affected by the pesticides. If you are applying pesticides yourself, be sure to follow all safety instructions carefully.
In addition, when using pesticides in a home or office building, it is important to cover or remove any foods, toys, children’s items, pets and other valuables. This will protect them from any chemical odors that may be present after treatment and help to ensure they are not exposed to any residual chemicals. Ventilation of the area should be good after treatment to disperse any remaining odors.
Suppression
If preventive measures fail, or eradication is not possible due to the threat to human health and/or property, suppression is often the goal. Suppression involves reducing pest populations to an acceptable level through chemical, biological and mechanical means.
Threshold-based decision making is the best approach to determining when action is needed. For example, noticing a few wasps around the house or yard does not necessitate pest control, but seeing them every day and in large numbers probably indicates that their presence is becoming a problem.
The natural forces that influence all organisms also affect pest populations, causing them to rise and fall. These factors include weather, environmental conditions, natural enemies, available food and water supplies and other resources.
Natural enemies — predators, parasites, pathogens and competitors — injure or consume pests to limit their population sizes. This form of pest control is the foundation of biological controls, which include the use of beneficial insects (e.g., lady beetles and lacewings), nematodes and plant disease pathogens.
Cultural practices can also significantly reduce the ability of pests to reproduce, disperse and survive in a treated environment. This category includes such tactics as changing irrigation methods, cropping techniques, fertilization regimes and modifying tillage practices.
Mechanical and physical controls include such tools as traps, pheromone lures, barriers, diversionary plantings, weed barriers and herbicides. Chemical controls typically include a broad range of products, from organic insecticides to synthetic chemicals. The most common chemicals are insect growth regulators, fungicides and herbicides.
Some species of insects, nematodes and plants are naturally invasive and can have negative effects on surrounding habitats and ecosystems. They can disrupt native plant communities, displace desirable plants and negatively impact soil quality, moisture availability and fire events. These organisms are considered pests when they adversely affect humans, their properties or the natural environment. In some cases, a pest will become so problematic that it is considered a significant nuisance to the local community. In this case, local governments may implement a regulatory control program to eradicate the problem. This type of control can be more costly and time-consuming than prevention or suppression, but it may be necessary in some situations.
Eradication
When eradication of pests is not possible, control methods aim to keep the problem below a tolerable level. Usually, this means prevention or suppression. However, eradication can be a viable goal in indoor situations where certain pests, such as cockroaches or mice, can pose health threats. For example, rodents can spread pathogens like hantavirus and e-coli through their droppings and urine, while flies can transmit Shigella bacteria.
Physical
Traps, netting and decoys are physical pest control solutions that prevent pests from entering your property in the first place. They can include repellents, which act as a deterrent to pests (e.g., spiders, earwigs, silverfish, house centipedes) or insecticides that kill pests, such as ant baits, termite gels, sprays and powders. Physical controls can be messy to use, and some may require you to handle a trap or decoy, but they are an effective, economical way to deal with certain pests.
Biological
Many people prefer natural pest control methods over chemical treatments because they are generally less toxic to humans and pets. These methods are also often more environmentally friendly. For example, a vinegar solution can repel mosquitoes; sprinkle cinnamon on ants’ trails to destroy their nest; put out a bowl of water with slices of cucumber and melon to attract and drown gnats; or plant chrysanthemums near your home to discourage spiders.
Another effective option is microbial pesticides, which use naturally occurring soil bacteria to destroy pests (e.g., Bacillus thuringiensis for beetles and flies). Some of these solutions can be applied without any handling, but others must be handled to work properly.
Regular yard maintenance is another important step to take to avoid pest problems. Remove weeds and tall grass and trim back branches to reduce places for pests to hide. Don’t leave out pet food or water for extended periods, and keep garbage cans tightly closed. Don’t store firewood or other materials against your house, as they can be a magnet for pests looking for shelter.
IPM
Integrated Pest Management (IPM) is the best way to keep pests under control without resorting to toxic chemicals. IPM programs focus on prevention and suppression by reducing sources of food, water and shelter for pests. When control methods are needed, they are used judiciously and with the least possible risk to people, pets, plants and the environment.
IPM techniques involve monitoring the pest population and environmental conditions on a regular basis to determine if action is needed. Using inspection checklists, sticky traps and other tools, you can develop a pest identification system to accurately diagnose problems.
When a problem is detected, an effective treatment strategy may involve nonchemical strategies such as growing plants that are well adapted to the site and climate, improving soil quality, adjusting irrigation and fertilizer levels or caulking cracks in buildings to prevent insect or rodent access. When necessary, a chemical control may be added. The goal is to keep the pest population below economic injury level, which varies by crop type and season.
The first step in an IPM program is to set action thresholds, which are the points at which pests will become a nuisance or health threat. For example, a juniper with many chewed needles is at the point of needing a control, but a single aphid on a kale plant is not. The thresholds are based on a combination of the pest’s behavior, appearance and damage to the plant or its surroundings.
An important aspect of IPM is the use of natural enemies, which are predators and parasitoids that kill or disrupt the pest’s life cycle. These organisms are often released intentionally to manage pest populations. It is critical to research any predator or parasitoid species before releasing them in your garden. You must find a reliable source, learn how and where to release them, and choose organisms that target the specific pest you’re trying to manage.
IPM programs also encourage the use of mechanical controls, such as hand picking, barriers, tillage or traps to reduce pest numbers. All of these tactics are less expensive and safer than pesticides, which pose some risk to humans and beneficial insects.
Why You Should Consult a Car Accident Lawyer
Car accidents can be complicated, especially when it comes to insurance claims and fault determination. Regardless of whether you were injured or just suffered damage to your vehicle it’s wise to consult an NYC car accident lawyer.
Your lawyer will help you even the playing field against at-fault insurers by gathering and reviewing evidence. They’ll also consider all your losses when determining compensation including medical expenses, future costs, lost income, and pain and suffering. Contact Frederick Car Accident Lawyer now!

Car accident lawyers can help you get the medical attention you need. They can handle your insurance negotiations and legal procedures, allowing you to focus on recovery from your injuries. They can also provide peace of mind during a stressful time.
Your attorney can also make sure that your doctors are medical professionals who will take proper care of your injuries. They can also set up appointments with doctors that specialize in your type of injury. For example, a cranial osteopathy specialist would be the best option for head injuries, while an orthopedist is a good choice for musculoskeletal injuries.
Seeing a doctor as soon as possible is important for your health, but it’s also necessary to prove your injuries and recover compensation for them. Taking the time to see a doctor ties your injuries directly to the accident and documents them, so it’s harder for an insurance company to argue that they are unrelated.
A car accident lawyer can also help you document your damages, including past and future losses related to your injury. They can calculate your economic damages, which can include medical bills, lost wages, and other expenses related to the accident. They can also document your non-economic losses, such as pain and suffering and the emotional toll of the crash.
An experienced car accident lawyer will also be familiar with the laws that apply to your case, which can help you understand your rights and make informed decisions about how to proceed. They will know how much time you have to file a claim, what evidence you need to gather, and the types of damages you can seek. They will also be aware of any special circumstances, such as an extenuating event or insurance policy details, that could affect your claim.
Documenting Your Injuries
Documenting injuries is important for medical and legal purposes. From a medical standpoint, it ensures that your injuries are treated appropriately and helps in meeting legal requirements for filing an accident claim. From a legal standpoint, it strengthens your case by providing evidence of your injuries and establishing the extent of your damages.
Documentation of your injuries includes taking photos while at the scene of the crash, obtaining copies of all hospital and doctor’s records, keeping a pain journal, and collecting witness testimony. It is also crucial to obtain a copy of the police report from the accident scene.
It is also important to keep track of all your expenses and losses related to the accident. This may include medical treatment, car repair costs, lost wages, out-of-pocket expenses such as travel and prescription medications, and other financial losses. It is important to consider long-term losses as well. This is why it’s vital to find a car accident lawyer who takes a comprehensive approach to building a case, taking into account all the ways your injury will impact you in the future.
When choosing an attorney to represent you, make sure they have experience representing car accident victims and a strong track record of success in winning cases. They should also be willing to go to trial if necessary, rather than settling for the first offer by the insurance company. They should also be familiar with local laws and court procedures, particularly in New York. You want an attorney with experience in handling all types of car accidents and who has a reputation for fighting for the best results for their clients. The best attorneys will have a track record that includes a few cases they took to trial.
Filing a Claim
Car accident lawyers can help you build a strong claim and maximize the value of your settlement. Among other things, they can ensure that your claims cover all the ways the crash has affected you. These can include current and future medical treatment costs, lost income, property damage, and non-economic damages like pain and suffering.
They can also ensure that the insurance company is held responsible for paying your claim, and they will work to find out if there are any other sources of compensation you might be entitled to. They can review all of the information related to the accident, including police reports, witness statements, and other relevant documentation. They will often go back to the scene of the accident themselves and speak with investigators to get the facts straight.
The lawyer can even negotiate with the at-fault party’s insurance company on your behalf, and they will fight to make sure that you are compensated for all of your injuries, damages and losses. If the insurance company is unwilling to negotiate, the attorney can file a lawsuit on your behalf in order to hold them accountable.
When selecting a car accident attorney, look for one who is highly experienced in handling personal injury cases and has a track record of success. They should be familiar with New York City law and have a thorough understanding of the complex issues involved in car accidents. They should be highly professional, communicative and passionate about fighting for their clients’ rights. They should also be available to answer your questions promptly and clearly. They should also be willing to work on a contingency fee basis, which means that they only get paid when they win.
Negotiating with the Insurance Company
Car accidents are not just physically and emotionally devastating, but they also bring with them significant financial burdens. Medical bills, vehicle repair or replacement costs and lost wages can add up quickly.
A top Board-Certified Houston car accident lawyer can help you determine how much your claim is worth and negotiate a fair settlement. When you prepare a demand letter, be sure to include the full extent of your injuries, including the number of medical visits and surgeries, as well as any future treatments you may need. You should also detail the impact of your injury on your life, such as ongoing emotional stress and a diminished quality of life.
In many cases, the insurance company will start with a low offer that is far below what you need to cover your losses. This is because the insurer’s priority is to make as little money as possible on your claims.
An experienced attorney can help you counter the insurance company’s initial offers with a strong, well-documented demand of your own. Depending on the strength of your evidence, you may need to renegotiate several times before arriving at a final settlement that covers your losses.
In addition to negotiating with the insurance company, your lawyer can investigate whether any other parties were responsible for your car accident and pursue compensation from them. In some states, the law allows injured parties to pursue third-party liability for their medical expenses and property damage. In these instances, your lawyer will leave no stone unturned in determining all liable parties and gathering the necessary proof to establish their fault. This can increase your chances of getting a higher settlement.
Going to Trial
Car accident victims are often confronted with complex legal and medical issues. Attorneys are skilled negotiators who can level the playing field against insurance companies and protect their clients’ interests throughout the process.
A lawyer can help victims establish fault by reviewing police reports, eyewitness accounts, medical records, and other documentation. They can also review the accident scene and the damage to vehicles or other property to determine what caused the crash.
They can also determine the adequacy of insurance coverage, helping victims avoid undervaluing their claims. They can also help their clients navigate confusing laws and regulations, and assist with filing paperwork. Finally, lawyers can help their clients avoid mistakes that could compromise their cases such as admitting fault or accepting a low settlement offer.
An experienced car accident lawyer will have years of training and experience in tort law and negligence theory, so they can provide sound advice about how to proceed with a case. A qualified lawyer can also draw on their extensive network of professionals such as accident reconstruction experts, medical professionals, and financial specialists to support a client’s claim.
Car accidents can be traumatic for victims, who may suffer serious injuries such as traumatic brain injury, broken bones, and significant property damage. They can require weeks of recovery and thousands in medical bills. A New York City car accident lawyer can help victims get the compensation they need for their losses. They can collect evidence, give legal advice, negotiate with the insurance company, and if necessary, take the case to trial. Contact the attorneys at Mirman, Markovits & Landau PC to learn more about how they can help. They are available to meet with potential clients for free initial consultations.
The Benefits of Hiring Interior Painters
Professional interior painters use various tools and techniques to turn walls into some sort of artwork. These include ragging (creating texture with cloth), sponging, colorwashing and stippling.

They also know how colors communicate emotions and can help people create a space that is uniquely their own. For example, warm colors often evoke passion while cool colors can be calming and serene. Contact Above And Beyond Painting for professional help.
A fresh coat of paint can make a huge difference in the appearance and overall aesthetics of a home or business. It can hide dents, scuffs, and discoloration, allowing the underlying surfaces to shine through. It can also add a touch of drama or sophistication to a space, whether through an elegant accent wall or by using trendy colors such as deep blues and serene sage greens.
Professional painters possess a thorough understanding of the intrinsic complexities associated with different paint types, application techniques, and surface preparation – knowledge that plays an essential role in ensuring optimal results. Moreover, they know how to properly seal surfaces to prevent humidity and wear-and-tear from impacting the durability of paint.
In addition, experienced painters use their superior project management skills to deliver quality results within stipulated timelines and budgets. This makes them an invaluable asset to any homeowner who’s looking to complete a renovation project in a timely and efficient manner.
Moreover, experienced interior painters have mastered the art of cutting in the edges with a brush, saving you from the hassle and cost of buying and applying tape. This technique, known as stippling, creates a smooth band of color along the edge of a wall, providing a finished look. In addition, they have a keen eye for detail and are adept at navigating the many nuances of the painting process.
They can even help you choose the right shade for your walls, taking into account how light reflects off of it and how it will affect the ambiance of the space. For example, they can recommend lighter shades that will help a small room appear larger or darker shades that will make it cozier.
In addition, they can also recommend low or no VOC (Volatile Organic Compound) paints that will minimize harmful emissions, allowing you to live in a healthier environment. These paints are especially useful for high-traffic areas like entryways, hallways, and kitchens.
They Can Make Your Home Look Attractive to Potential Buyers
When it comes to home improvement, interior painting is one of the most cost-effective and easiest ways to transform the look and feel of a space. It is also a great way to make your home more appealing to potential buyers and increase its resale value. However, it is important to hire the right professional for the job. A reputable interior painter will have extensive training and certification, as well as years of experience. They will know how to choose the best colors, prepare surfaces, and apply the correct technique to achieve a high-quality finish.
Color plays an important role in a room’s ambiance and can affect your mood, so it is vital to choose the right shade for your home. A professional interior painter will be able to help you select the right shade and ensure that it is applied correctly. They can also recommend different types of finishes to enhance the look of your space.
Choosing the right color is essential to making your home more attractive to potential buyers. Lighter shades of color can make rooms appear larger and more open, while darker shades of paint can create a more intimate feeling. It is also important to choose a color that is consistent throughout your home. A cohesive color scheme can make your home feel more spacious and welcoming, and it will also create a sense of harmony and continuity.
Another way to improve the appearance of your home is by updating your flooring, countertops, and cabinetry. However, these projects can be time-consuming and expensive, especially if you hire a professional to do the work for you. Interior painting is a much quicker and easier project that can be done in a fraction of the time. It is also a cheaper option than replacing your furniture and other fixtures.
Another advantage of interior painting is that it can protect your walls from moisture damage and staining. It also makes cleaning your walls and ceilings easier, as paint is more resistant to dirt and grime than unpainted surfaces. A fresh coat of paint can also improve your home’s energy efficiency by lowering your heating and cooling costs.
They Can Make Your Home Look More Comfortable
When it comes to updating a home’s interior, painting is one of the simplest and most cost-effective ways to increase its value. In fact, a fresh coat of paint can create an entirely new look and feel for any living space, making it more inviting to potential buyers. In addition, painting can help you create a home that better suits your own personal style and taste.
Experienced interior painters have a well-honed understanding of the various factors that influence the application of paint and finishes. This includes a comprehensive understanding of the appropriate application techniques for various surfaces, as well as an in-depth knowledge of color theory and design principles. In turn, this ensures optimal results that meet or exceed client expectations.
Furthermore, professional painters are able to identify and address any surface repairs or preparation issues that may affect the outcome of a paint project. This includes patching holes, repairing cracks or gaps, smoothing rough or uneven surfaces, and removing old wallpaper or adhesive residue. As a result, they can deliver superior results that will endure over time.
Aside from its aesthetic appeal, a good quality paint job can also improve the air quality in your home. This is because it can reduce the amount of harmful volatile organic compounds (VOCs) that are released into the air. In addition, professional painters can offer low-VOC options for those with allergies and sensitivities to chemicals.
Another way that a fresh coat of paint can make your home more comfortable is by creating the illusion of space. For example, light-colored paint can make a room appear larger by reflecting and bouncing around the walls. In contrast, dark-colored paint can make a room appear cozier and more intimate.
Finally, a fresh coat of paint can also increase the overall comfort of your home by creating an inviting and warm environment. This is because light-colored paint can make a space feel open and airy, while dark-colored paint can create a sense of privacy and warmth. In contrast, dingy or outdated colors can feel cramped and uncomfortable.
They Can Make Your Home Look More Attractive
If you are planning to sell your home, a fresh coat of paint can make it more appealing to potential buyers. This is a cost-effective way to make your home look new and modern, and it will also increase its value. A professional interior painter can help you select the right color scheme to enhance your space. They will also help you with the best techniques for preparing the surface for painting and making it look smooth.
If your home is old and outdated, a fresh paint job will give it an attractive and inviting appeal. In addition, it will help you avoid costly repairs and maintenance. A professionally painted home is also less likely to get mold and other problems. You can even get a higher price for your property if you use neutral colors that will appeal to a wide range of potential buyers.
One of the best things about a fresh paint job is that it can instantly transform a room into something completely different. This makes it an ideal way to try out home remodeling trends without investing in a full remodel. However, choosing the right color scheme is not always easy. You will need to understand the principles of color psychology to ensure that the colors you choose match with your furniture, flooring, and artwork. You can also take inspiration from your existing elements and color palette to create a cohesive design.
Professional painters can make your home look more appealing by applying the right kind of primer to the surface before painting. This will allow the paint to adhere better and prevent peeling later on. They can also use low-VOC paints that will reduce the amount of harmful chemicals released into the air. These kinds of paints are safer for the environment as well as for your family members and pets.
An experienced and skilled professional will use the latest equipment and tools to prepare the surfaces for painting. This will ensure that the final product is flawless and smooth. They will also make sure that the right amount of paint is used and avoid any overspray. In addition, they will use the best quality materials that will help in offering a long-lasting and durable finish.
Roof Maintenance – Why You Should Have Your Roof Inspected
Your roof is one of the biggest investments you’ll make as a homeowner, so it needs to be maintained properly. Regular inspections and timely repairs can prevent serious problems from arising, like rot, leaks, or mold.

Unmaintained roofs can also reduce your home’s energy efficiency, leading to higher utility bills. Inspections and maintenance tasks can help you stay insulated and save money.
Performing a visual inspection involves using the naked eye to assess the condition of equipment, materials and structures. The process is commonly used in quality assurance (QA) and QC programs to evaluate the suitability of items for use. The American Society for Nondestructive Testing (ASNT) defines visual inspection techniques in its Recommended Practice (SNT-TC-1A, 2020). These techniques include direct, indirect and guided visual inspections.
Visual inspections can be conducted from the ground or from an elevated platform, such as a ladder or scaffolding. Regardless of the method chosen, it is important to perform a thorough exterior surface assessment of the roof to identify any areas of concern. This may include examining soffits, fascia and eaves for signs of rot or water damage. It should also involve examining roof components, such as the decking, insulation, ventilation and gutters, to determine their overall condition. Inspectors should be sure to check for the presence of moss and lichen growth, as well as any areas where shingles or tiles are missing.
Another common area of concern is the condition of flashing. It is important to inspect these areas from various angles and to note any gaps or areas where the flashing is pulling away from the roof surface. Inspectors should also look for the presence of deteriorated sealant around penetrations and perimeter flashings. If sealant is found to be damaged, the caulking or flashing should be repaired.
The benefits of conducting regular visual inspections are significant. In addition to detecting problems, they can help establish a maintenance schedule, which will save money in the long run. Regular inspections can also help with insurance and warranty issues. Many policies and warranties require a documented history of inspections in order to maintain coverage or validity.
Professional inspectors can offer valuable insights into a roof’s condition. In addition to their expertise, they often have specialized tools and techniques that allow them to do a more thorough job of assessing a roof than would be possible with a simple visual inspection. This can include thermal imaging technology, drone capabilities and other specialized equipment.
Attic Inspection
Attic inspections help identify and prioritize issues that can affect the quality and longevity of a roof. They also help ensure that a home’s ventilation system is working properly and that a building has enough insulation. In addition, attic inspections can reveal other structural problems that may not be visible from the ground or interior of a home, such as wood rot and mold growth.
During an attic inspection, a home inspector will walk around the area and examine any obvious damage or leaks from the ground or from within the attic itself. They will also check for sagging areas of the ceiling and other potential problem spots. They will also look for evidence of pests, such as droppings or chewed insulation or wires.
Because of the way that a roof and attic are constructed, it is very important to have proper ventilation. Insufficient ventilation can lead to moisture accumulation, which can cause mold and mildew, or even rot and structural damage. During the attic inspection, a home inspector will evaluate the attic’s ventilation system and ensure that the ridge vents, soffit vents, or gable vents are open and unblocked.
Home inspectors are required to inspect attics that are readily accessible without posing safety risks, including pulling down ladders or climbing stairs. It’s a good idea for homeowners to schedule an attic inspection every year, and especially after the winter or spring.
Aside from identifying issues, an attic inspection can also help to identify the age of a roof. If the shingles are older, they’re more likely to be damaged by weather or wear and tear. Similarly, if the shingles are buckling or granules are missing, they’re more prone to water penetration and rot. By identifying these issues early, they can be fixed promptly before the damage is extensive. This helps to protect the structure of a roof, improves indoor air quality, and reduces energy costs. It can also prevent potential buyers from being surprised by expensive repairs once they move into a home. This is a major reason why it’s so important to have regular home inspections and to get any problems fixed as soon as possible.
Thermal Imaging
Roofing professionals often use thermal imaging in addition to visual inspections. This technology allows them to locate roof leaks and moisture intrusion that might not be visible with the naked eye. It also saves time and money by allowing them to spot problem areas before they become worse.
A thermal camera works by capturing infrared light, which is a part of the electromagnetic spectrum that is invisible to human eyes. Wet insulation retains heat longer than dry materials, so it shows up on a thermal image as warmer spots than surrounding material. This helps roofing professionals find the source of leaks, rot and mold damage.
Before thermal imaging was available, roofing professionals used other tools to find moisture intrusion in commercial buildings. Those tools were more labor-intensive and involved sacrificial samples to test for leaks and condensation. Thermal images are quick and easy to read, and they allow building owners to identify problem areas so that they can be repaired quickly before further damage occurs.
Because the temperature of the roofing material changes throughout the day, it is important to schedule a roof inspection at an optimal time. The most effective times are early morning or shortly after sunset during a cooling phase. This is when the roof will absorb the most heat during the day and release it later in the evening. This makes wet areas easily identifiable in a thermal image, which displays apparent temperature differences as gradient colors.
A good thermal scan can save a business thousands of dollars by enabling them to address wet insulation and other problem areas before they cause serious damage. The information in a thermal scan can help businesses determine the most cost-effective approach to repair, including whether they need to replace the entire roof or simply patch damaged areas. It can also identify potential insurance claim issues that might arise in the future.
Investing in a thermal scanner is a great way for a roofing contractor to provide a value-added service to their clients. However, ensuring that team members are trained to interpret the images correctly is essential to getting the most out of this technology.
Gutter Inspection
Gutter inspections are an important part of roof maintenance. They help to direct water runoff away from the foundation of a home, which prevents structural damage and basement flooding. They can also prevent wood rot and interior moisture problems, as well as mold growth. During gutter inspections, inspectors can check for clogs, blockages, and water intrusion from eaves. They can also check for downspout connections, ensuring they are properly sealed and that they are not damaged or disconnected. Inspectors can check for debris accumulation on downspouts and in the corners of the gutter system. Inspectors can also look for a rusty metal flashing, which may indicate that the gutter system has been compromised over time.
Gutters can become clogged with leaves, twigs, and other debris that blocks water flow. Clogged gutters can lead to water backup, which can cause damage to the roofing and the side of a house. A homeowner should have their gutters inspected at least twice a year, once in the spring and again in the fall. Inspectors can use ladders to clear away any debris from the gutters and downspouts and can inspect the downspouts for water flow. Inspectors can also check the condition of the gutter aprons, which connect the gutters to the structure of the roof. Inspectors can test the effectiveness of the gutter system by pouring water into the highest points of the system and looking for holes or cracks in the gutter.
A home inspector should also examine the gutter system to ensure it is properly sloped and draining. Gutters should slope 4 to 6 feet away from the foundation of a home, allowing water to move quickly away from the foundation and prevent damage from excessive moisture buildup. Home inspectors can recommend adding gutters if the home does not have them or if the existing gutter system is overloaded with debris.
Integrating roof maintenance into a regular home maintenance schedule protects your investment and can prevent costly repairs down the road. By scheduling roof maintenance and inspections, ensuring proper ventilation, clearing debris, checking insulation levels, addressing leaks, preventing ice dams, and performing gutter inspections, you can keep your home protected from the elements and extend its lifespan.
The Importance of Position in Poker
Poker is a game that requires skill and strategy. It can also be a nerve-wracking experience. However, if you’re careful, you can minimize your risks. One important element of this is position.

The basic game of poker involves two cards dealt to each player and five community cards. The goal is to make the best five-card hand possible. Visit https://www.pokertalk.it/workshop to learn more.
Poker is a game where chance and skill are both required to win. A player’s luck can affect their performance in the short term, but over time the application of skill will eliminate luck’s impact on a player’s results. This is why so many people choose to play poker.
The first step in the game of poker is placing money in a betting pot. The amount of money placed in the pot is determined by the rules of each variant of the game. Once the players have placed their chips, they are dealt two cards that are hidden from the other players. The player must then make a hand of five cards from these two and three community cards that are revealed to the players. The player with the best hand wins the pot.
There are several ways to win a round in poker, including raising your bet and bluffing. To raise your bet, you must say “raise” and then the other players can call it or fold. If you want to bluff, you must read your opponents to identify their tells.
After the flop, there is another round of betting. The player to the left of the dealer places a bet. There are usually two or more betting intervals for each Poker deal. After the final betting interval, the 5th card is dealt face up and the showdown begins. The best poker hand wins the pot with all bets made during that round.
Some people think that there is no skill in poker, but this is not true. The most important skill is understanding the odds of winning a hand. This is done by calculating the probability of getting a certain card. For example, if you have one spade in your hand, the probability of drawing a second spade is (13 / 52 = 0.32 ). In addition to calculating the odds of a specific card, a good poker player should also practice playing by watching experienced players and imagining how they would react in a particular situation. This will help them develop their instincts faster and become a more skilled player.
Game of skill
Despite the many different variants of poker, most of them feature a similar structure. Players start by placing money into the pot for betting, and then they are dealt cards from a standard 52-card deck. The best hand wins the pot and all the money that has been bet during that round of play. Although luck can heavily influence a single hand, it tends to balance out over thousands of hands, allowing skill to prevail.
However, a study published in the Journal of Gambling Studies suggests that poker isn’t as much of a game of skill as it’s often portrayed. The study involved 300 participants who played 60 hands of poker, and found that the experts didn’t fare much better than non-experts.
Another way to determine whether poker is a game of skill is by studying the variance in the game’s outcome over time. This is the difference between a player’s average profit and his or her loss, and it allows you to calculate the percentage of games that are won by each type of player. A higher variance in a game means that the players’ profits are more volatile and harder to sustain.
Nonetheless, some people still claim that poker is a game of chance, and it’s important for them to understand the importance of variance. It’s a critical part of the process for learning how to make money in poker. It can be easy for a beginner to overestimate the role of skill over short timeframes, and to end up losing more than they’re winning.
To avoid these pitfalls, you should focus on the long-term profitability of your strategy. This will help you to overcome the volatility of luck and gain a competitive advantage over your opponents. In addition, you should try to find weaker players and take advantage of their mistakes. You can do this by observing how they bet, or by calling their raises with the knowledge that they’re likely to fold. The more you play, the more your skills will improve, and you’ll be able to win more than you lose.
Game of psychology
A good poker player is not only concerned with the cards in his or her hand, but also knows how to read his or her opponents. This ability comes from keen observation, understanding human behavior, and picking up on non-verbal cues. It can be used to decipher whether an opponent is bluffing or holding a winning hand. Mastering the psychology of the game can help players make more informed decisions and achieve greater success at the tables.
Psychological factors like self-discipline, confidence, and the ability to read opponents are essential for successful poker play. Many books on the subject are available to assist players in improving these aspects of their game. These books provide methods and techniques for controlling emotions, reading tells, and making deliberate decisions. In addition, they offer strategies for avoiding cognitive biases and maintaining emotional control.
One of the most important psychological skills in poker is managing emotions, which can often interfere with logical decision-making. This is especially true in times of conflict or failure, when the emotions of anger and frustration can cloud judgment and lead to impulsive decisions. This is why it is crucial for poker players to be able to recognize and manage their emotions.
It is also important to stay focused at the poker table, so that you don’t miss any opportunities. If you get distracted, it’s easy to miss important information, such as a tell or your opponent’s betting patterns. This could cost you a pot or even your tournament.
Another key aspect of poker psychology is understanding your opponents’ moods and psychology. This involves paying attention to their facial expressions, and observing their behavior at the table. For example, you should look for signs of fidgeting or nervousness, glancing around the table, twitchy fingers, inadvertent grins, and gulping noises. These are all indications that an opponent is feeling insecure or afraid, and may be more receptive to your bluffing.
Using poker psychology in conjunction with advanced poker strategy can prove very profitable. By studying your opponents’ mental and emotional states, you can exploit them and gain a competitive edge at the poker table.
Game of strategy
Many players use a mix of different strategies to win poker. The most important thing is to have a consistent strategy that you stick with. This will prevent you from playing emotionally-based poker games, known as playing on tilt. It is also important to set a budget for your game and not chase your losses. You should play conservatively and only call with strong hands. This will force weaker opponents to fold, and you will make more money in the long run.
Each player purchases a certain amount of poker chips at the start of a game. Each chip has a value, which is usually described as the number of white chips it represents. A white chip is worth the minimum ante or bet; a red chip is worth five whites; and a blue chip is worth 20 or 25 whites. In addition to these chips, a poker game may have additional chips called kitty chips, which are used for food and drinks.
During each betting interval, the player to the left can call the bet, raise it, or drop out of the pot. When a player drops out, they forfeit any chips that have put into the pot. The best hand wins the pot. Occasionally, there will be a tie among the best five-card hands and the pot is shared between those players.
One of the most important elements of a winning poker strategy is understanding your opponent’s behavior and style. This is accomplished by studying your opponent’s tells and observing their actions in previous hands. Typical tells include obsessively peeking at good or bad cards and chip stacks, twitching of the eyebrows, a change in the timbre of their voice, and other gestures that telegraph anxiety or excitement. Professional players are highly attuned to their opponents’ tells and can often read them.
A key element of a winning poker strategy is knowing your odds. This is achieved by calculating the probability that you will get the cards you need for a winning hand, as well as the probability that your opponent’s will call your bets. This knowledge can be useful in bluffing, as you can try to induce your opponent to fold their superior hands by betting heavily on yours.